|
Dry Cleaner
Bag Birthday Candle Powered Fire Balloons --
overflite NOTICE: All Balloonists are warned that they build and fly Fire Balloons completely at their own risk, and that they are completely responsible for determining all risks, and for any consequences that result! Remember, you are completely responsible for every balloon you fly! Review Warnings & Cautions at the end of page Model Hot Air Balloon Designs - The Straw Boss: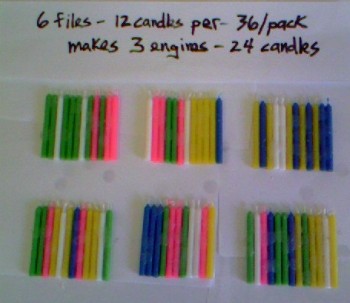 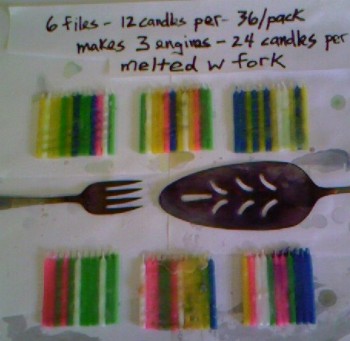 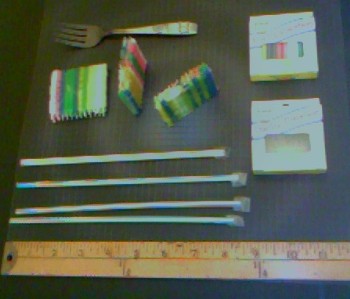 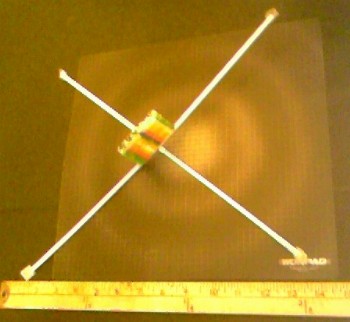 Current favorite balloon is the 20 to 24 candle Straw Boss. It is a much more technologically advanced fire balloon than many of the youtube knuckle-scrapers. Keep in mind that this balloon barely flies. It only has around 1 1/4 ounces of total lift. Typically it weighs slightly more than its lift. So it has to burn down slightly to get enough lift to fly. But in perfectly calm weather it will tend to rise on its own column of hot air. And once it gets going it can climb to over 1,000 feet and stay visible for miles. The most available correct bag is the 54 inch tall bag - 54x20x4 (.5) (1/2) mil dress/suit bag. Which is 24 inches wide. Some vendors also sell the five foot tall bag -60x20x4 (.5) (1/2) mil dress bag. Which should also work well, and with added volume too. Some vendors also sell the six foot tall bag - 54x20x4 (.5) (1/2) mil gown bag. Don't know how this bag would work. Since it seems real tall. But if it does work then it should get pretty good lift. CORRECT BAG VENDOR Ventilation - Remember, the bag needs to be taped at the top. Plus some pencil-sized holes need to be put into the top of the bag to ventilate the balloon. Otherwise hot air billowing out the bottom will destabilize the balloon. The correct birthday candles are 36/pack/ounce. Standard engine is made with a double-file of either 12+12=24 candles, in cooler weather, or 10+10=20 candles in hot weather. The reason for the fewer candles in hot weather is so the balloons don't overheat and melt out their tops, thereby risking losing altitude or a crash & burn. The reason for the double-file is to make the engine compact, sturdy and easy to pin onto the drinking straw frame. The frame is made with 4 drinking straws, stuck together to form an X. Do not crimp straws! Small flaps of scotch tape are taped over the ends of the straws. So the frame can be scotch taped to the bag fairly easily. It only takes a few minutes to assemble the balloon. It only takes a minute or two to launch the balloon in calm weather. Flight time is up to ten minutes or so. Climb is perhaps 1500 feet or so. Travel is around a mile or so. Visibility is also around a mile or so, fairly bright, and longer somewhat dim. GOOD IDEA - Purchasing a roll of dry cleaner bags is a good idea. For the 54x20x4 .5 mil dress bag, a 500 bag roll costs around $50 or so, plus tax & shipping. Which is also a very useful purchase for storing clothes and travelling. BTW some vendors also have all the other bags do not work. Especially the thicker ones, like .65 and .75 mil. There is hardly any allowance for any extra weight at all for this particular balloon to fly. CORRECT BAG VENDOR WARNING - DO NOT CRIMP ANY OF THE STRAWS - Reason is that any crimping will weaken the straw. This could cause the straw to fail in flight, which would cause the frame to collapse. Possibly leading to a crash & burn. If you accidently crimp one of the straws and it looks weak you can tape a piece of scotch tape around it to reinforce it. WARNING - DO NOT fly any 24 candle & 5 cubic feet balloons in temperatures above 80 F !! Reason is the bag could melt. Melting temperature is estimated at 230 F average temperature. 24 candles will heat the bag around 150 F. This means the bag could melt if the ambient temperature is above 80 F then the bag could melt. INSTEAD - Reduce the size of the engine to 22 candles. Or to 20 candles. (But no lower because otherwise the balloon does not have enough power to fly.) Figure each of the candles in the 20 - 24 candle range will raise or lower the temperature around 5 F. So the 22 candle balloon can be figured to heat the air by 140 F. Leading to a maximum ambient temperature of 90 F. While the 20 candle balloon will heat 130 F and have a maximum ambient of 100 F. Also... If you are flying a balloon and suspect the top of the balloon might melt then add more ventilation holes. NOTES ON VENTILATION HOLES - Ventilation holes are needed to provide the balloon with "negative draft." To ventilate some of the air that gets sucked up into the balloon by the candles. Otherwise hot air will be forced down and around the bottom of the balloon. Billow. Which will cause the balloon to sway from side to side to release the accumulated hot air. Plus possibly burn out its sides. Leading to a possible crash & burn. HOW MANY - ventilation holes and where to put them is a considerable issue. People pretty much have to think about it and make up their own minds about what is best. My best guess is around 10 total pencil sized holes. Slightly down from the top. Like maybe a foot or so. But could try more. Just not too many. Or the balloon will start to lose lift. Can also put the ventilation holes more towards the middle of the balloon. So the balloon won't lose its hottest air. But who knows. Maybe it would cause more turbulence instead. Can also put a lot of ventilation holes near the bottom of the balloon. Where the holes don't matter so much. And possibly put fewer ventilation holes in at the top. See which you like best. ----------------------------------------- Model Hot Air Balloon Designs: EASIER TO MAKE The classic X-frame design, or "Straw Boss," uses a drinking straw frame. Here, the straws are lengthened by sticking two straws into each other. Scotch tape is then carefully overlapped over the ends. This creates flaps, so the frame can easily be attached to the balloon bag. The two sets of straws are then pinned together with a shirt pin, to make an "X." The engine is then stuck onto the pin too. Then two additional pins attach the upper straws to the engine. There is no need for additional dripped wax to hold the engine in place. Be careful not to break the engine with the pins. SPIN the pins around. Like you are drilling through the wax. Any damage can be repaired with dripped wax. GOOD IDEA - A "double-file engine" keeps the flame further away from the plastic, and is easier to attach to the frame. This engine is made by attaching two single-files of birthday candles together with dripped wax. But it is somewhat less efficient than the single-file engine, and it also melts down faster. Also, if the frame is narrow, any loose plastic at the bottom of the balloon should get taped together, so it doesn't flap into the flame. HARDER TO MAKE - DIFFERENT BALLOON MODEL - The classic H-frame design, or "Little Boy," uses a balsa stick frame, and a "single-file engine." The candles are lined up, next to the flat side of a balsa stick. A heated fork and dripped wax melt everything together, into an "engine stick." Balsa sticks are then tied onto each end, to make an "H." The top of the bag is sealed closed with scotch tape. It is then ventilated, with five to ten pencil holes, to stabilize the balloon in flight. The frame is then scotch taped to the dry cleaner bag. BAD IDEA - Optionally a "round engine" can also work. It is made by wrapping a rubber band around the candles, and melting wax between them. It is quick to make. But it heats less, and is significantly less efficient than either of the other two engines, since the center candles tend to get starved for oxygen. In addition the outer candles tend to melt down very quickly. SO-SO IDEA - DIFFERENT BALLOON MODEL - The design
components can be mixed. For example,
drinking straws can be made into an H-frame, or
balsa wood can be made into an X-frame. The
H-frame design is more advanced. Balsa
sticks are more advanced too, but are more
expensive, and harder to find. Drinking straws are
easy to find. Drinking straws should not be
crimped. This weakens them a lot, so they
could become crimped in flight, which is very bad
news, since it could cause a crash and burn. Aerostatics of Dry Cleaner Bag Balloons: So, figure 20 candles will heat the air around 130 F. Figure 22 candles will heat the air around 140 F. And figure 24 candles will heat the air around 150 F. Idea is if an extra candle will heat the air more than the weight of the candle then the extra candle will improve lift. BUT... The balloon will start to melt at around 230 F. So number of candles should be limited to 22 candles above 80 F. And should be limited to 20 candles above 90 F. A standard 4 1/2 foot tall, 1/2 mil dry cleaner
bag weighs about 6/10 of an ounce. Twenty
birthday candles, the ones sold 36 to a
pack, weigh a little less than 6/10 of an
ounce. The balsa or straw frame weighs
around 1/10 of an ounce. Hence the total
weight of the balloon should work out to a little
over 1 1/4 ounces. So the weight and gross
lift are close to the same. Balloon Making Tools and Materials: Dry Cleaner Bags -- 1/2 mil (12 micron)
thickness only -- 4 1/2 foot tall (54 inch)
"dress bags" weigh 6/10 of an ounce. They
usually open up to 24 inches wide. (POLY
(54 The longer 6 foot "gown
bags" also work, but are usually not available in
1/2 mil thickness. Avoid shorter bags, since
they don't hold enough volume to fly. For
specifications, and mail-order supply houses on
the web, See
Appendix. NOTE: Nowdays, many dry cleaners use 3/4 mil bags, which Do Not Fly. If the bags seem "too easy" to open, then they are probably the wrong ones. Otherwise weigh a bag, or two at once, with the postage scale. If you find the right bags, most dry cleaners will sell you bags at around 25 cents each. For better performance, try making Homemade Bag Balloons. Scotch Tape is used to seal the hanger hole at the top of the dry cleaner bag, and to attach the frame to the bag,. Also, for the drinking straw frame, it can be used to hold the straws in place inside each other, and to draw together any loose plastic. Pencil or Pen is used to punch ventilation holes into the bag. Five to ten holes at the top of the bag, or around the upper middle of the bag create "negative draft." Otherwise the balloon wobbles a lot, because hot air billows out of the bottom of the bag. A series of ventilation holes can also be made at the bottom of the bag to provide additional fresh air to the engine. Birthday Candles -- 2 x 3/16 inch -- sold 36 to a one ounce pack -- weigh 1/36 (.028) of an ounce per candle. So, a twenty candle engine weighs 9/16 (.555) of an ounce, plus the wax used to pin the candles together and to reinforce the engine. Cakemate, the most prominent brand, is sold in many supermarkets. Also look in variety stores. NOTE: Nowdays 36/pack candles may be hard to find, especially since Cakemate was spun off by McCormick Spices. So balloonists may need to substitute with 2 1/2" x 1/4" candles, which are sold 24 to a one ounce pack. Here the candles weigh 1/24 (.042) of an ounce per candle. A twenty candle engine weighs over 13/16 (.83) of an ounce. This is much too heavy for a dry cleaner bag balloon to fly. So the engine needs to be burned down to weight, before attaching it to the balloon. Otherwise the balloon builds up too much carbon dioxide, which suffocates the flame, and which is a lot heavier than air. Also, since the engine is wider, the frame should be made a little wider too, so the flame doesn't get too close to the plastic. Utility Candle is used to pin the candles together, with melted wax, prior to melting them into an engine. It is also used to fill in any gaps in the engine and to attach it to the frame. Optionally, it can be used to make an engine from scratch, in the field, with the extra weight then getting burned down. Boxes of inexpensive candles are sold in supermarkets. Old Dinner Fork or Serving Fork is heated over a Stove or Sterno Can, and drawn across the candles, to melt them together into an engine. Experienced engine makers may use a Pie Server.Items are available in supermarkets. Do not use your regular silverwear, since the heat and wax ruins them for eating purposes. Sterno is available in hardware stores. For Straw Boss - Plastic Drinking Straws -- Straight - 7 1/2 to 9 inches long -- are usually sold in supermarkets. (Otherwise the flexible straws can be cut off, at the accordian.) Look around for straws that are light. Heavier straws weigh more. Small one-inch or so pieces of scotch tape are flapped over one end of each straw. To make a tab or flap. To make it easy to attach the frame to the bag. Then two straws are stuck together to make a double-straw. Then the two double-straws are pinned together with one of the shirt pins. Then the engine is pinned to the frame. First on the one shirt pin. Then the other two shirt pins are stuck through the straw and engine to secure the engine in place. and ... 3 Shirt Pins, which is used to pin
the drinking straws together, and to pin the
engine in place. DIFFERENT MODEL - For wood frame model - Balsa Wood Sticks -- 1/8 x 3/16 inch (3 x 5 mm.)-- are sold in three foot lengths, for around 50 cents each, at hobby shops and art supply stores. Foot long sticks -- three of them -- for the H-frame design, use up all the plastic at the bottom of the balloon. But if the engine-stick is made 13-15 inches long or so, and the other two sticks are slightly shorter than a foot, the flame tends to stay farther away from the plastic. DIFFERENT MODEL - For wood frame model - Nylon String, (For balsa wood frame) Cut into foot long lengths. Used to tie the "outer sticks" onto the ends of the "engine stick." Heavy thread may be substituted. Avoid using cotton string, because it smolders, and might not go out before reaching the ground. Preparation of Balloon Bags (Envelopes) Balloon bags need ventilation holes. Otherwise, excess hot air billows out of the bottom of the balloon. This causes the balloon to sway from side to side, and lose lift. It also risks melting holes in the plastic. Also, the engine needs fresh air. The idea is to create "negative draft." Five to ten pencil-sized ventilation holes seem about right. More holes increase stability. But at some point, more hot air will get lost through the ventilation holes than through billowing and swaying. To get ten holes, punch five holes through both sides of the plastic, before opening up the bag. The original thinking was to put the holes at the top. The new thinking is to put the holes in the upper middle part of the bag, to preserve the hottest air. In hot weather though, put at least one or two holes at the top, to function as "release valves" in case the plastic reaches its melting point. Optionally, a series of ventilation holes, at the bottom of the bag, also increase stability, and provide extra fresh air. When you open up the bag, make sure to open up
the creased folds, along the two sides of the bag,
all the way. Otherwise, the balloon has
significantly less volume. Manufacture of Birthday Candle Engines The single-file engine is more efficient than either the double-file or round engine. It has more cooling area, so it melts down less. It gets more exposure to the air, so it heats better. So, for the other two engines, a few extra candles are recommended. In cool weather a 24 candle engine is good to make, since two packs of 36/pack candles makes three engines. NOT AS GOOD - DIFFERENT MODEL - But this is how to make the file. - To make a single-file candle and balsa wood "engine-stick," first line up the birthday candles right next to each other, on top of a piece of paper. Then center the flat side of the balsa stick right next to them. Light the utility candle. Drip wax between each candle, and between the candles and the stick, so everything is lightly pinned together with wax. Let cool. Now heat the fork, over the stove or sterno, until it is very hot, but not red hot. Then quickly run the tongs across the candles, so they start to melt together. Now light the utility candle, and run a bead of wax between the candles and the stick. Then reheat the fork, and continue melting everything together. Avoid overmelting, or exposing the wicks. Let cool. Slide a notecard, underneath the candles and stick, to free them from the paper. Turn everything over, and melt that side together too. Let cool. Inspect the "engine-stick." Fix any flaws with melted wax, or with the heated fork. Make sure the end candles have enough wax. Optionally, run the heated fork along the balsa stick so it is lightly covered with wax. Optionally light the candles for a moment, to make them easier to light later, or to burn off any extra weight. Optionally the engine can get attached to the balsa stick in the field. BETTER - THIS IS THE BEST ENGINE - To make a
double-file engine, melt together two
single-files of birthday candles. Either
12+12=24 in cooler weather. Or 10+10=20 in
hot weather. Then match the two
single-files together, and drip wax between them
until everything is secure. Optionally, in a
pinch the engine can be made with melted wax
alone, and get burned down to flying weight.
But this is poor design. In any case a 20
candle engine should only weigh around 9/16 of an
ounce or so, and a 24 candle engine should only
weigh around 2/3 of an ounce, or less. BAD IDEA - To make a round engine, wrap the candles in a rubberband. Drip wax between the candles until everything is pinned together. Remove the rubberband. Drip wax until everything is secure. Burn down to flying weight. BETTER - THIS IS THE BEST BALLOON - STRAW BOSS - Assembly of Drinking Straw X-Frame Balloons To stick two drinking straws together, make a
small crease in the end of one straw and squeeze
it together so it will fit inside the other
straw. Moisten it so it slides in
easier. Push it around an inch into the
other straw. Make two sets of
straws. Be very careful not to crimp
any of the straws. This weakens them and
could cause the frame to fail in flight, resulting
in a possible crash and burn. To make the X-frame, stick the shirt pin through the junctions of both sets of straws, perfectly straight. If the pin is not symetrical the engine won't stand up straight. One strategy here is to line up the two sets of straws together and stick the pin through both straws at once. If the pin is not straight, reposition the straws and try again. To attach the engine, first stick it onto the
pin, right in the middle, and butt it up against
the drinking straw. Then stick two more pins
into the engine through the drinking straws, to
secure the engine well in place. The X-frame is attached to the bag with scotch tape, around a half inch above the bottom of the bag. To make the attachments secure a scotch tape "tab" is folded over the end of each drinking straw. The tab can then be scotch taped to the bag. Depending on the size of the frame, there will be
loose plastic that can flap into the flame, hence
risking damage to the bag, and trashing of the
balloon. To eliminate the slack, draw it up
and attach it together, with small pieces of
scotch tape. NOT AS GOOD - DIFFERENT MODEL - Assembly of Balsa Stick H-Frame Balloons To make the H-frame, balsa sticks are tied onto the ends of the engine stick, flat sides matching. First make a slipknot and tighten it around the joint. Then wrap the string around the joint several times in each direction, tighten, and securely knot. With tight knots, 1/8" x 3/16" balsa should be secure enough so the engine doesn't tip over. If thinner sticks are used, or if the knots are not tight enough, the joints can be strengthened by dripping a few drops of melted wax on the knots. The H-frame is attached to the bag with scotch tape, around a half-inch above the bottom of the bag. To make everything symetrical the knots can be lined up with the center crease of the bag. Otherwise it doesn't matter. First open up the bag, upside down, and fit the frame inside the bag. Then systematically scotch tape the frame to the bag. Each piece of tape should be around 3 inches long, and should have a good tight grab on three sides of the balsa stick and the plastic. Make sure to tape the ends of the balsa sticks securely. Around 10 pieces of tape or so should do the job. Make sure everything is good and strong, but
light. The balloon will fit into a grocery
bag for transportation. But make sure to
place it in the bag so the engine stick is
vertical. Otherwise gravity will tend to
break the engine off the stick. SO-SO IDEA - NOT VERY GOOD - Assembly of "Mixed-Component" Balloons The H-frame can be pinned together with shirt pins, and be reinforced with scotch tape, so the pins don't come loose. Alternately, string wrappings, reinforced with wax, might work, if the straws are sanded. Otherwise the engine will tip over. A 14 inch drinking straw "engine stick" sounds okay. But the "outer sticks" need to get cut down around 10 inches. Additionally, the engine is attached to the drinking straws after is is made, whether single-file or double-file. So very special care must be taken not to damage the drinking straws, with either the melted wax, or with exposure to the flame. Balsa Stick X-frame Designs: With
balsa sticks the H-frame design is better, since
it is more advanced. Otherwise the main
issue is how to hold the "X" together. Glue
doesn't work. It snaps. String can
work okay, if the windings are not too large, but
the engine has to get notched. Otherwise the
shirt pin is recommended, but make sure not to
split the balsa sticks. Flying Dry Cleaner Bag Fire Balloons Also - Never fly balloons in drought or fire danger conditions. And especially not near any hills or anywhere the balloons might crash. Balloonists are responsible for determining safe conditions. Dry cleaner bag balloons don't have much lift. At elevations above several thousand feet they might not fly at all. They also don't fly very well in hot weather. In windy conditions, crashes into nearby obstacles are likely. Regular living trees don't readily catch on fire. But whatever you do, don't crash balloons into any dead needle-filled pine trees. In any case, if you crash any balloons, you are obligated for safety reasons to stand there, and watch them until they go out. Prior to launch you should have launch sites in mind that takes advantage of prevailing wind patterns. Things to look for include an open view, open space, and natural wind blocks, such as buildings, bushes, large trees, low hills and ground depressions. Try to figure out the best launch sites, that avoid crashes,and that avoid terrain induced "wind tunnels." Also figure out different strategies for different wind directions. Prior to launch you should have a good idea of which way the wind is blowing, the speed, and whether it is gusting. In many places in the world YAHOO WEATHER has the windspeed. In the US, you can also try calling 976-1212, for forty cents. Ideally the wind should be calm. For dry cleaner bag balloons ideally it should also be cold and close to sea level. Otherwise the balloons don't get much lift and will tend to fly low on the horizon. You will be happier if your balloons fly high in the sky. Avoid winds over seven miles per hour. Balloons can still fly in light rain and snow too, as long as it is not too windy. Generally once balloons are launched and they clear obstacles they will tend to keep flying. They float in the "slipstream" which is relatively calm. Gusts greater than fifteen miles per hour will typically blow out the candles. Balloon crashes in windy conditions will also tend to blow out. Also remember that the wind tends to operate in cycles, speeding up then slowing down. Hence, in windy conditions, try to start the launch when a speeding cycle is slowing down. There are basically two launch methods. The first method is to launch the balloon from a protected area, then once it is buoyant to walk it out into the open and release. The second method is to light the balloon in large open area, then walk it downwind as it fills with hot air. You can also have people stand around the balloon to block the wind. Generally a balloon is launched by two people. One person holds the top of the balloon. The second person lights the engine, starting in the middle, then once the bag has some air, lighting towards the ends. Use your hands to keep the plastic away from the flame when the bag is filling up with air. Once it is filled with hot air it is much less vulnerable to flame damage. Don't worry about getting all of the candles lit, except for the end candles. Over a period of around thirty seconds the flame will jump from candle to candle until the engine is completely lighted. If there are any obstacles in the area, let the hot air build up until the balloon has strong lift. When you are confident the balloon will fly, release it and watch it fly away. NOTES: If a balloon is too heavy to fly, burn it down a little, in a protected area, blow it out, purge the "bad air" and try again. Remember that there are tradeoffs between Power and Lift, Weight and Time. So you can add more power, and get more lift, but at the expense of more weight too, unless you burn off some of the weight, and sacrifice flight time.
Fire Balloons! Warnings and Cautions:Once a fire balloon
gets launched it becomes completely
uncontrollable. It can't be
recalled. Fire... flying through the
sky. You had better hope it has a
successful flight. If it crashes and
starts a fire and the police get involved then
it is important to confess. Since it can
only get worse if the police have to track you
down. But balloons that crash in trees
that go out? Forget about it. Also
to remember that the sky does not catch on
fire. So hope the balloons go up really
really high. Then burn out. Then
they are safe. Since nothing happened.
Do not fly fire balloons in any fire danger areas, especially if they are hilly or mountainous, or if it is windy or gusting. Do not fly any faulty or damaged fire balloons. Avoid Crash and Burns. Balloonists are obligated not to cause any fire danger. Also, fire balloons should not be made too large, in case they land directly in automobile traffic. The FAA prohibits operating any "Unmanned Free Balloon" in a hazardous manner, per FAA/DOT 101.7 The FAA also prohibits including any significant amounts of metal, on devices that fly to altitudes where there may be aircraft. Do not fly wire frame fire balloons. They can be dangerous to turbine engine aircraft. They can also short-circuit electrical power lines. Do not fly fire balloons near airports. Especially avoid active takeoff and landing patterns. Avoid flying fire balloons near any other prohibited or restricted areas without permission, as appropriate, unless it is very late at night -- and doesn't matter. Build flightworthy balloons, according to the
conditions. Avoid flying fire balloons in winds
above ten miles per hour, especially if
gusting. Avoid damaging balloons or crashing
them into obstacles. Avoid antagonizing the police
or neighbors. Monitor the complete flight of
every balloon. Be responsible, and use good
judgement. As long as candle powered fire balloons don't
crash and burn, there is not a big fire
danger. The plastic bag does not appear
likely to become a serious hazard either, as long
it isn't very large and it doesn't land directly
in automobile traffic ================================== By
Thomas Taylor -- balloons@overflite.com Appendix -- Specifications for Plastic "Garment Bags" and a List of Supply HousesFlying Dry Cleaner Bags -- 1/2 Mil ( 12 Micron ) Weight Only -- Heavier Bags and Shorter Bags Don't Fly
A mil is 1/1000th of an inch. A half-mil equals .0005 inches. Most dry cleaner bags have a folded section, called a "gusset." The opened width equals the width of the roll, plus the gusset. Hence a 20x4x54 garment bag is 54 inches tall, the roll is 20 inches wide, the gusset is 4 inches wide and the bag opens up to 24 inches wide. If the opened width is only 23 inches, the volume is 8% less, which is not good. If the opened width is 25 inches, the bag holds 8% more, which is great. Mils are not a perfect determinant of bag weight. More accurately, the weight of a bag equals the weight of the roll divided by the number of bags. The number of bags per roll varies by the distributor. The following distributors carry bags that appear to meet the qualifications for hot air balloon flight. Many people buy garment bag rolls for home use, to store clothes: Bradley's Plastic Bag Company has a great bag in its Catalogue. The bag is a 21x4x54, or 54 inches tall, on a 21 inch wide roll, with a 4 inch gusset, or 25 inches wide. The bag is .00045 inches thick, or slightly less than a 1/2 mil. There are 667 bags on a 27 pound roll, so each bag weighs slightly more than 6/10th of an ounce. The cost per single roll is $52.34 plus shipping, or around 8 cents per bag. Their toll-free number is 800-621-7864. "Buy these Bags!" NOTE: Bradley's .35 mil super lightweight
20 inch bag does not have a gusset, so it is too
narrow for candle powered balloons. It might
be okay though for school science projects. Saket Plastic Bag Company in North Hollywood, California also has a very good 1/2 mil bag in its Catalogue. The bag is a 20x4x54 and .00045 inches thick. There are 466 bags to a roll. Saket also has a 20x4x72 bag, with 350 bags on a roll. Their toll-free number is 800-457-2538. |
www.overflite.com balloons@overflite.com - - - - - - |